Thursday, March 9, 2023

Digital Signature Implementation Using Angular 2 Signaturepad


Create A New Angular Project

Use the Angular CLI tool to create an Angular project. Execute the following command to create the project.

  • ng new signaturePadProject
  • Would you like to add Angular routing? Yes
  • Which stylesheet format would you like to use? CSS

What is a SignaturePad?

SignaturePad is used to sign a document digitally using a stylus or mouse cursor pointer. At the end of the document, there will be a box that allows the user to sign the document on a web application. After saving the document the signature gets stored in a base64 type image.

What’s Different Here In Our Blog?

In this blog, we will use angular2-signature pad dependency for the signature pad but the signature pad returns the base64 URL for the image if we wanted the actual image of the signature then what should we do?

Install Digital Signature Pad In Angular

To install the angular2-signature pad use this command

~ npm I angular2-signature pad

Your package.json will look like this
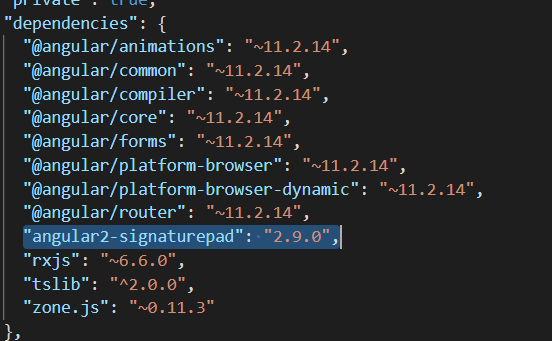
Signaturepad

Now, add go to AppModule.ts file and add SignaturePadModule in imports
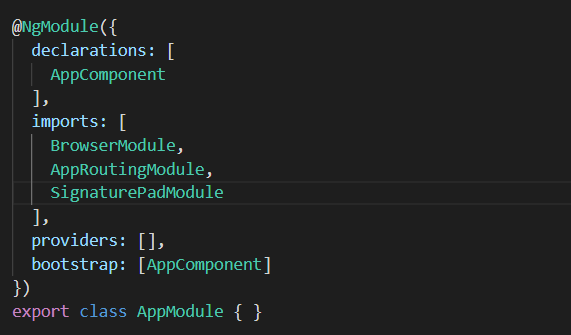
AppModule

Now, in the app.component.ts file add this

@ViewChild(SignaturePad) signaturePad: SignaturePad;
signaturePadOptions = {
minWidth: 2, // used for pen width after writing
canvasWidth: 400, // for canvas width
canvasHeight: 100, // for canvas height
}

Add this in-app component HTML file

canvas

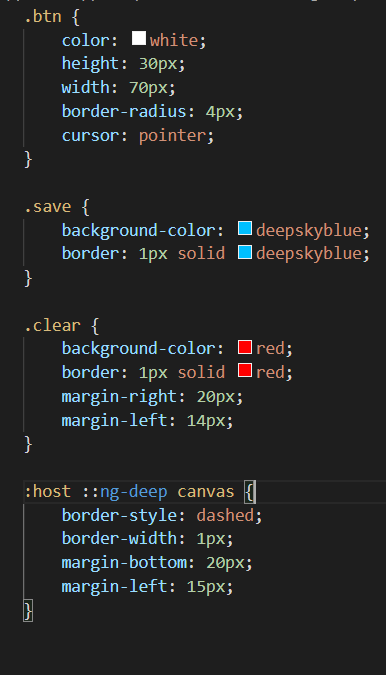
In the CSS file add this

css file

Create A Service Image-Conversion

Now we’ll create a new service for Image compression to keep the code of image conversion in one place so that we won’t have to write the code again and again. To generate the image conversion service in the service folder, execute the following command

–        ng generate service services/image conversion

This will create an ImageConversionService inside the services folder.

Also Read – Angular CLI Project Setup

Update the ImageConversionService

Now, open the image-conversion-service.ts file inside the services folder and make the following changes:

Import {Observable} from ‘rxjs’

We will create a separate method in the image-conversion.service.ts file called convertToImage() that will take base64 as a parameter and this will return an observable of File type. The function will look like

image conversion

As you can see, it’s showing an error because we are not returning the Observable, so let’s add the functionality to convert the base64 to an image
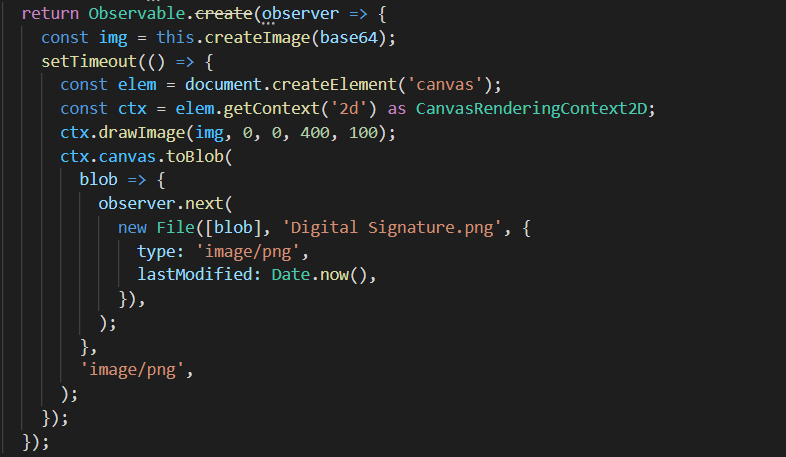
Observable

Here, we are getting an image using the function createImage function in which we have passed the base64 string and that function is returning an image.
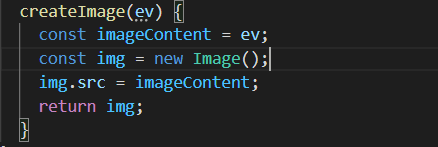
CreateImage Function

CreateImage() function will look like this.

After getting the image from the createImage() function, we are creating a canvas element using the document.createElement(‘canvas’). Using the canvas element we will create a 2D rendering context using the function getContext(‘2d’) as CanvasRenderingContext2D that will return into a new variable ctx.

Using the ctx variable we will create the image and then using the toBlob function we will return the observable of the image.
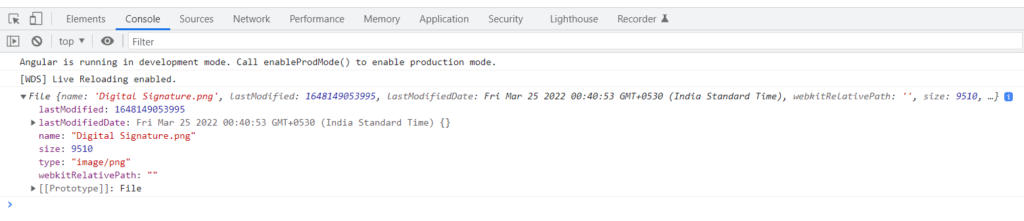
rendering context

Your Final Code Will Look Like this

app.module.ts

import { SignaturePadModule } from 'angular2-signaturepad';
Imports: [ SignaturePadModule ]

image-conversion.service.ts

import { Observable } from 'rxjs';
convertToImage(base64): Observable<File> {
return Observable.create(observer => {
const img = this.createImage(base64);
setTimeout(() => {
const elem = document.createElement('canvas');
const ctx = elem.getContext('2d') as CanvasRenderingContext2D;
ctx.drawImage(img, 0, 0, 400, 100);
ctx.canvas.toBlob(
blob => {
observer.next(
new File([blob], 'Digital Signature.png', {
type: 'image/png',
lastModified: Date.now(),
}),
);
},
'image/png',
);
});
});
}
createImage(ev) {
const imageContent = ev;
const img = new Image();
img.src = imageContent;
return img;
}

app.component.ts

import { Component, ViewChild } from '@angular/core';
import { SignaturePad } from 'angular2-signaturepad';
import { ImageConversionService } from './services/image-conversion.service';
@ViewChild(SignaturePad) signaturePad: SignaturePad;
signaturePadOptions = {
minWidth: 2,
canvasWidth: 400,
canvasHeight: 100,
};
constructor(private imageConversionService: ImageConversionService) { }
drawComplete(): void {
}
clearSignature(): void {
this.signaturePad.clear();
}
drawStart(): void {
// will be notified of szimek/signature_pad's onBegin event
}
save(): void {
const base64 = this.signaturePad.toDataURL();
this.imageConversionService.convertToImage(base64).subscribe(image => {
const img = image;
console.log(img);
});
}

Also Read – Angular 11 + Firebase Cloud Messaging Push Notifications

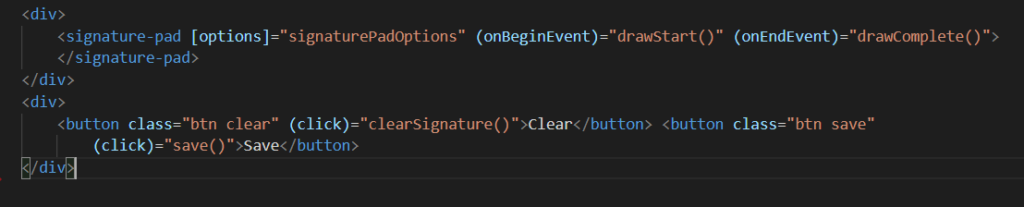
app.component.html

<div>
<signature-pad [options]="signaturePadOptions" (onBeginEvent)="drawStart()" (onEndEvent)="drawComplete()">
</signature-pad>
</div>
<div>
<button class="btn clear" (click)="clearSignature()">Clear</button> <button class="btn save"
(click)="save()">Save</button>
</div>

app.component.css

.btn {color: white;
height: 30px;
width: 70px;
border-radius: 4px;
cursor: pointer;
}
.save {
background-color: deepskyblue;
border: 1px solid deepskyblue;
}
.clear {
background-color: red;
border: 1px solid red;
margin-right: 20px;
margin-left: 14px;
}
:host ::ng-deep canvas {
border-style: dashed;
border-width: 1px;
margin-bottom: 20px;
margin-left: 15px;
}

FAQs

  • What is an angular2-signature pad?

Wrapper Angular2 Component for the signature pad and szimek. Visit Snyk Advisor to view a comprehensive health score report for an angular2-signature pad that includes the study of the community, maintenance, security, and popularity.

  • Is the angular2-signature pad popular?

A total of 31,449 downloads of the npm package angular2-signature pad are made each week. As a result, the popularity of the angular2-signature pad was acknowledged. To view the whole health analysis, go to the popular area of Snyk Advisor.

  • Is the angular2-signature pad well maintained?

Because the most recent version was issued less than a year ago, we discovered that the angular2-signature pad displayed a healthy version release cadence and project activity. Two open-source maintainers are working together on the project.

If you are interested in even more development-related articles and information from us here at Devstringx, then we have a lot to choose from for you.


Original Source:- https://www.devstringx.com/digital-signature-implementation

Wednesday, March 8, 2023

How to Build CRUD API Using Flask MYSQL?


Prerequisites

  1. Python3
  2. The MYSQL server is downloaded and ready to run
  3. Flask

Setting Up Our Back-end Environment

We need to run the following commands to install the library:

pip install flask_restplus
pip install flask
pip install mysql

Pip is a package installer for Python and it comes with Python. Flask is a popular Python web framework, meaning it is a third-party Python library used for developing web applications.

Flask-RESTPlus is an extension for Flask that adds support for quickly building REST APIs. Flask-RESTPlus encourages best practices with minimal setup.

It provides a coherent collection of decorators and tools to describe your API and expose its documentation properly (using Swagger).

REST or RESTful Methods

HTTP methods mapped to CRUD (create, read, update and delete) actions for a resource. Although you can make slight modifications such as making the PUT method to be created or updated, the basic patterns are listed as follows.

  • GET: Get/List/Retrieve an individual resource or a collection of resources.
  • POST: Create a new resource or resources.
  • PUT: Update an existing resource or collection of resources.
  • DELETE: Delete a resource or collection of resources.

Now as our project’s environment is ready, let’s get our hands dirty!

Step 1. Create the below app.py script(py is the extension to indicate Python script) where we import the flask module. Notice how we create a flask instance.

from flask import Flask 

from flask_restplus import Api, Resource, fields

app = Flask(__name__)

Step 2.  Set up the MySQL database configurations for connecting to the database. We need to configure the database connection with the flask module and that’s why we have imported the app module and set up the MySQL configuration with the flask module.

from flask_mysqldb import MySQL

app.config['MYSQL_USER'] = 'root'
app.config['MYSQL_PASSWORD'] = ''
app.config['MYSQL_HOST'] = 'localhost'
app.config['MYSQL_DB'] = 'crud'
app.config['MYSQL_CURSORCLASS'] = 'DictCursor'
mysql = MySQL(app)

Step 3. Next, we will define all the models required for the request format. This we can integrate with the API and swagger. This will tell the user what API is expecting. 

<script src="https://cdn.snipit.io/e.js" data-sid="41583"></script>

Step 4. Next, we will define all REST URLs for performing CRUD operations. It will also connect to the MySQL database server and query the database to read, insert, update and delete.

<script src="https://cdn.snipit.io/e.js" data-sid="41582"></script>
Recommended to Read- Making DB Connection (MYSQL) Using C#
Let’s See The Things In Action

To run the python Script we need to execute the following command in the directory where the python script is present.

Command – python app.py

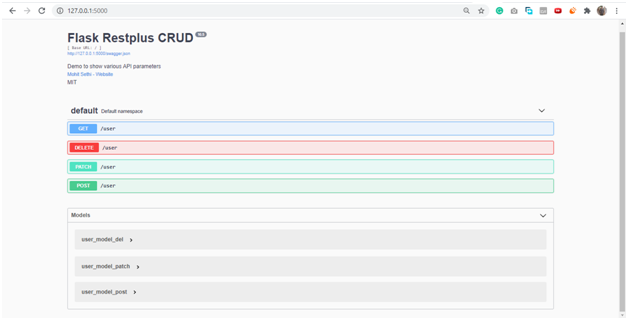
The server will get started at http://127.0.0.1:5000/


Swagger Url – http://127.0.0.1:5000/

Flask Restplus CRUD

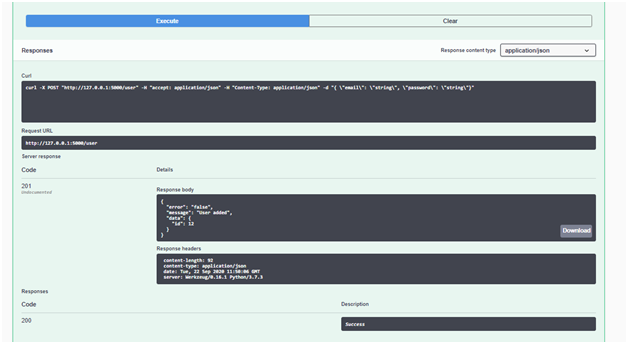
Post API

Post API

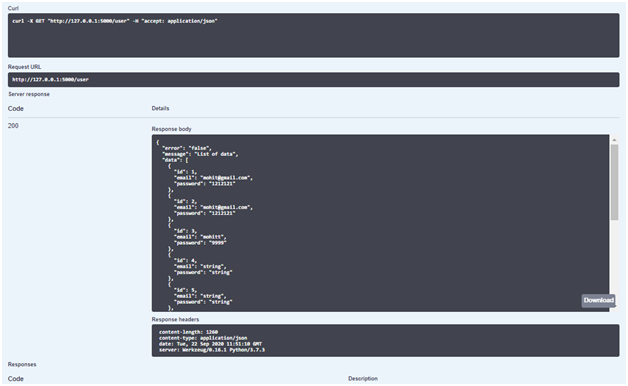
GET API

GET API


Related Post:-


Original Source:- Click Here

Is Chrome Developer Tool a Future For Test Automation?

  Devtools (Chrome Developer Tool)  is a powerful set of tools that helps web developers to build better applications. In this blog, we will...